

To convert sound to text, use a live transcription tool that turns speech into text on your screen as people talk. On iPhone and iPad, an app like iScribe shows live captions during conversations, meetings, and lectures, and saves the text so you can review it later. This is the fastest way to capture spoken words in the moment. If you already have a saved recording instead, see our guide on how to convert audio files to text.
You're in a noisy café, trying to catch a name, a phone number, or the last sentence of a meeting, and by the time you ask for it again, the words are already gone. That's the basic problem sound-to-text solves. Spoken information disappears fast, and a written transcript gives you something you can reread, search, share, or correct later.
For many people, that matters every day. Deaf and Hard of Hearing readers use transcription to follow live conversations. Students use it in lectures, professionals use it in meetings, journalists use it for interviews, caregivers use it for appointments, and plenty of people just want a record of what was said. If you want a plain-language overview of the basic workflow, convert audio to text is a useful starting point before you choose a tool.
Table of Contents
- When Spoken Words Slip Away in Everyday Life
- Picking a Device or App That Fits Your Situation
- Recording Audio the Listener Will Thank You For
- The Full Transcription Workflow From Open to Save
- Tuning Accuracy When the First Draft Is Not Good Enough
- Privacy and Connectivity Tradeoffs You Should Plan For
- Choosing the Workflow That Actually Fits Your Life
When Spoken Words Slip Away in Everyday Life
A server drops off food, someone speaks over the music, and the person across from you answers before you've caught the first sentence. A similar thing happens in classrooms, quick check-ins, phone calls, and healthcare visits. The problem isn't just noise, it's that speech is temporary, and once it passes, you can't review it unless you captured it.
That's why sound-to-text matters. It gives people a second chance at information that was easy to miss the first time. It also helps when attention slips, when accents are unfamiliar, or when a conversation moves too fast to keep up with by ear alone.
Speech recognition has come a long way from early pattern-recognition systems into today's cloud transcription tools, but the human need behind it hasn't changed. The goal is still simple: turn spoken words into something visible and usable. Modern ASR systems work by splitting audio into short frames of about 20–30 milliseconds, then reducing noise, normalizing volume, and decoding the signal into words, which is why bad mic placement and poor audio can still cause trouble even with good software. Google's guidance also recommends testing with at least 30 minutes of representative audio, and ideally 30 minutes to 3 hours, if you want a meaningful accuracy check. Google Cloud Speech-to-Text accuracy guidance
Practical rule: if you care about the transcript, treat the recording setup like part of the transcript, not separate from it.
People often start with a simple question, “How do I get the words on the screen?” The better question is, “What kind of conversation am I trying to preserve, and who needs to read it later?” That's where the right setup starts to matter.
Picking a Device or App That Fits Your Situation
The first choice is usually not the app, it's the device you already have in your hand. A phone works well for live conversations and quick capture. A computer makes more sense for longer sessions, file uploads, and editing. A dedicated transcription service can help when you need a more organized workflow, but it still has to fit the way you speak, listen, and save information.
Match the tool to the use case
If you're in a meeting, a laptop with a good microphone can be easier to manage because notes, email, and the transcript live in one place. If you're in a lecture, a phone or tablet can sit close to the speaker and stay out of the way. If you're transcribing an interview, file upload is often better than live dictation because you can review the recording later and correct names more carefully.
One option in this space is Live Transcribe iSrcribe, which is described as “See what's being said.” It's one example of an iPhone and iPad app focused on live speech-to-text and saved transcripts.
The features that matter most are usually practical, not flashy. Look for live captioning if you need real-time follow-along. Look for file upload if you already have recordings. Look for language coverage if you switch between languages or accents, and look for export options if you need to move text into email, notes, or shared documents. Summary tools can help too, but they work best after the transcript itself is solid.
| Setup | Best fit for | Strengths | Trade-offs |
|---|---|---|---|
| Phone app | Face-to-face chats, travel, quick notes | Always nearby, easy to start, good for live use | Screen space is small, editing is harder |
| Desktop app | Meetings, lectures, long edits | Bigger screen, easier review, better for saving files | Less portable, depends on mic quality |
| Dedicated transcription service | Interviews, file-based work, repeat workflows | Often supports uploads, exports, and organized transcripts | May add steps and can feel heavy for casual use |
If you want a live-caption workflow on a computer, the internal guide at real-time transcription software is a useful reference point for comparing how these tools behave in practice. If your main need is making transcripts from recordings, use TransClipper for transcripts is another example of a file-focused workflow that fits a different kind of user.
Recording Audio the Listener Will Thank You For
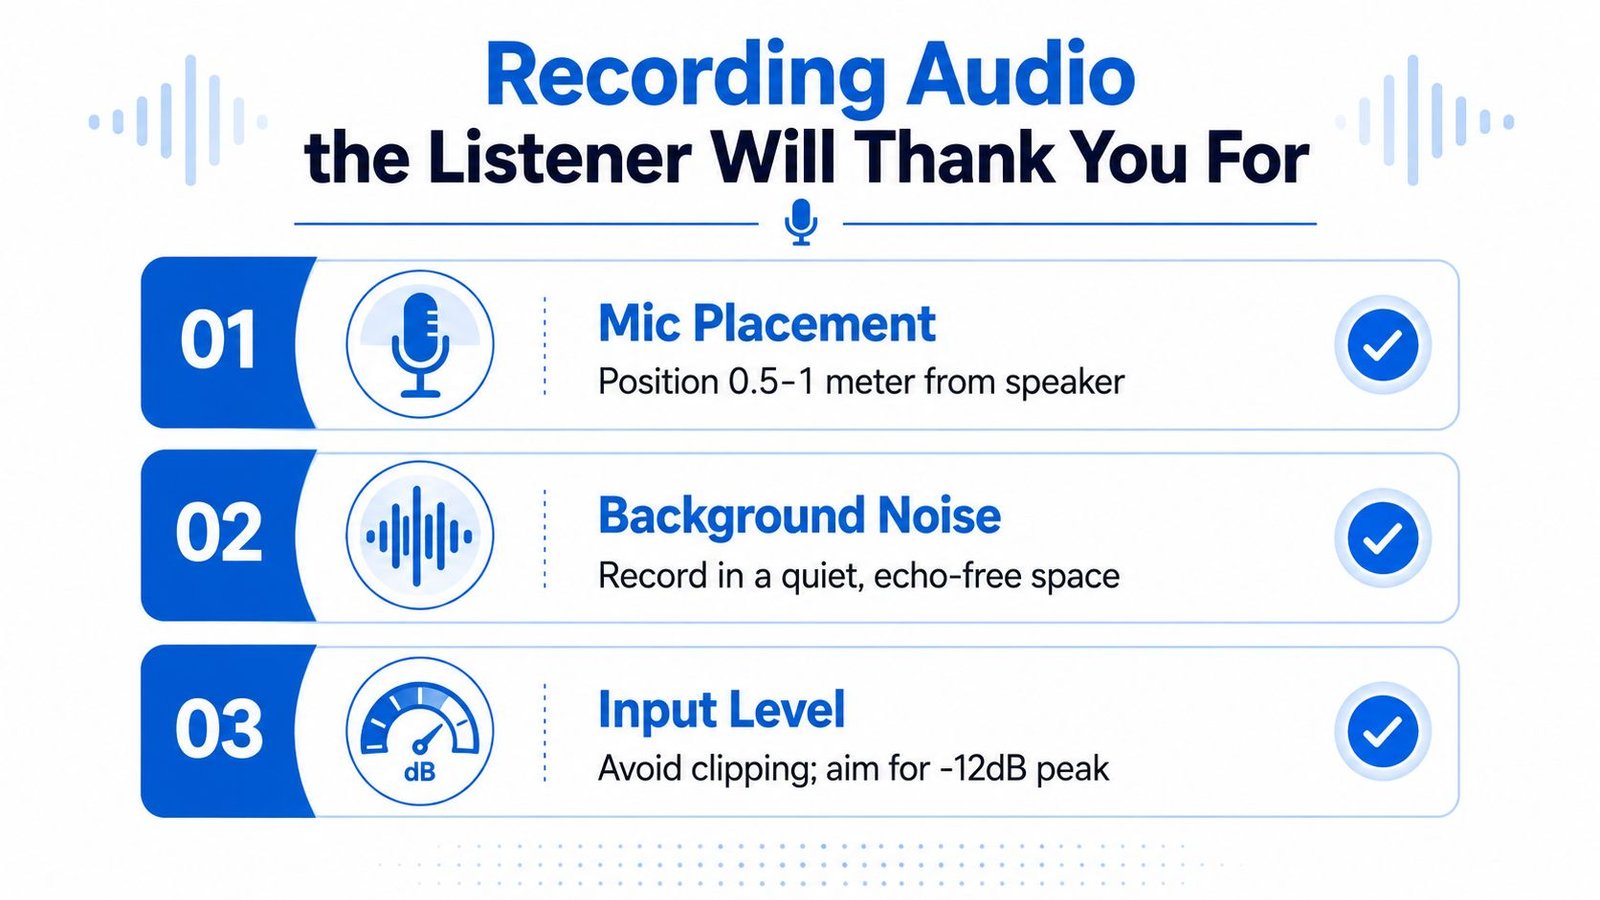
A transcript starts with the recording, not the app. If the mic catches echo, distance, or clipping, the software has to work like a listener trying to follow a muffled conversation from the next room. That is why a few small recording choices matter so much in cafés, classrooms, waiting rooms, and busy offices.
Start with microphone placement and input quality
Keep the microphone about 0.5 to 1 meter from the speaker. That range usually keeps the voice clear while lowering room noise. For file-based work, standard audio guidance also points to recording in 16-bit mono at 16 kHz or higher, and to watch the input gain so voice peaks stay below distortion. You can check a practical overview in Audacity's recording and setup guidance, which explains why clean input matters before any editing begins.
A lapel mic helps in a noisy restaurant or hallway because it stays close to the voice. In a classroom, placing a phone near the front can work better than holding it in your hand. For a quick call or interview, a quiet corner often helps more than expensive gear.
A transcript can only be as clear as the audio that reaches it.
Reduce noise before you record
If the room has echo, choose the softest space you can find. Curtains, carpets, and closed doors help more than many people expect. When your app offers noise suppression or voice activity detection, turn those on before you begin, then do a short test recording and listen back.
A quick check can save a lot of cleanup later. Short recordings are easier to review, but even long sessions benefit from a few minutes of setup. If you need a clear walkthrough on room treatment and cleanup, learn how to remove background noise from audio before you record. If you are also choosing a tool for video or social content, ShortGenius AI video ad maker sits in the broader speech and media workflow, though it serves a different job than transcription.
The Full Transcription Workflow From Open to Save

The workflow is usually straightforward once the audio is ready. You open the app, choose the language or accent model, turn on helpful features, then either speak live or upload a file. The hard part is not the button clicks, it's knowing which path fits the moment.
Live and file-based transcription follow different rhythms
Live transcription works best for conversations, meetings, and lectures where you need to follow along as people speak. File transcription fits recorded interviews, podcasts, voice memos, and videos because you can pause, replay, and clean up the result more carefully. If you're on a phone, the process often starts with the microphone. On a computer, it may start with an upload window or a record button inside a document or notes app.
Turn on the features that help the reader
Choose the correct language before you start. If the app supports accents or dialects, pick the closest match. Then enable punctuation, capitalization, noise suppression, and speaker labels if those options exist. Some tools also use timestamps, which make it easier to check where one speaker ends and another begins.
After transcription, read through the text once for names, jargon, and filler words. That last step matters a lot for meetings, interviews, and school notes, where the first draft may be close but not polished. Save the transcript in the place you'll use it, such as notes, email, a shared document, or a folder that you can find again later.
If your recordings come from an iPhone voice memo, the internal guide at iPhone voice memo to text can help frame the file-based path in a more familiar way.
Tuning Accuracy When the First Draft Is Not Good Enough
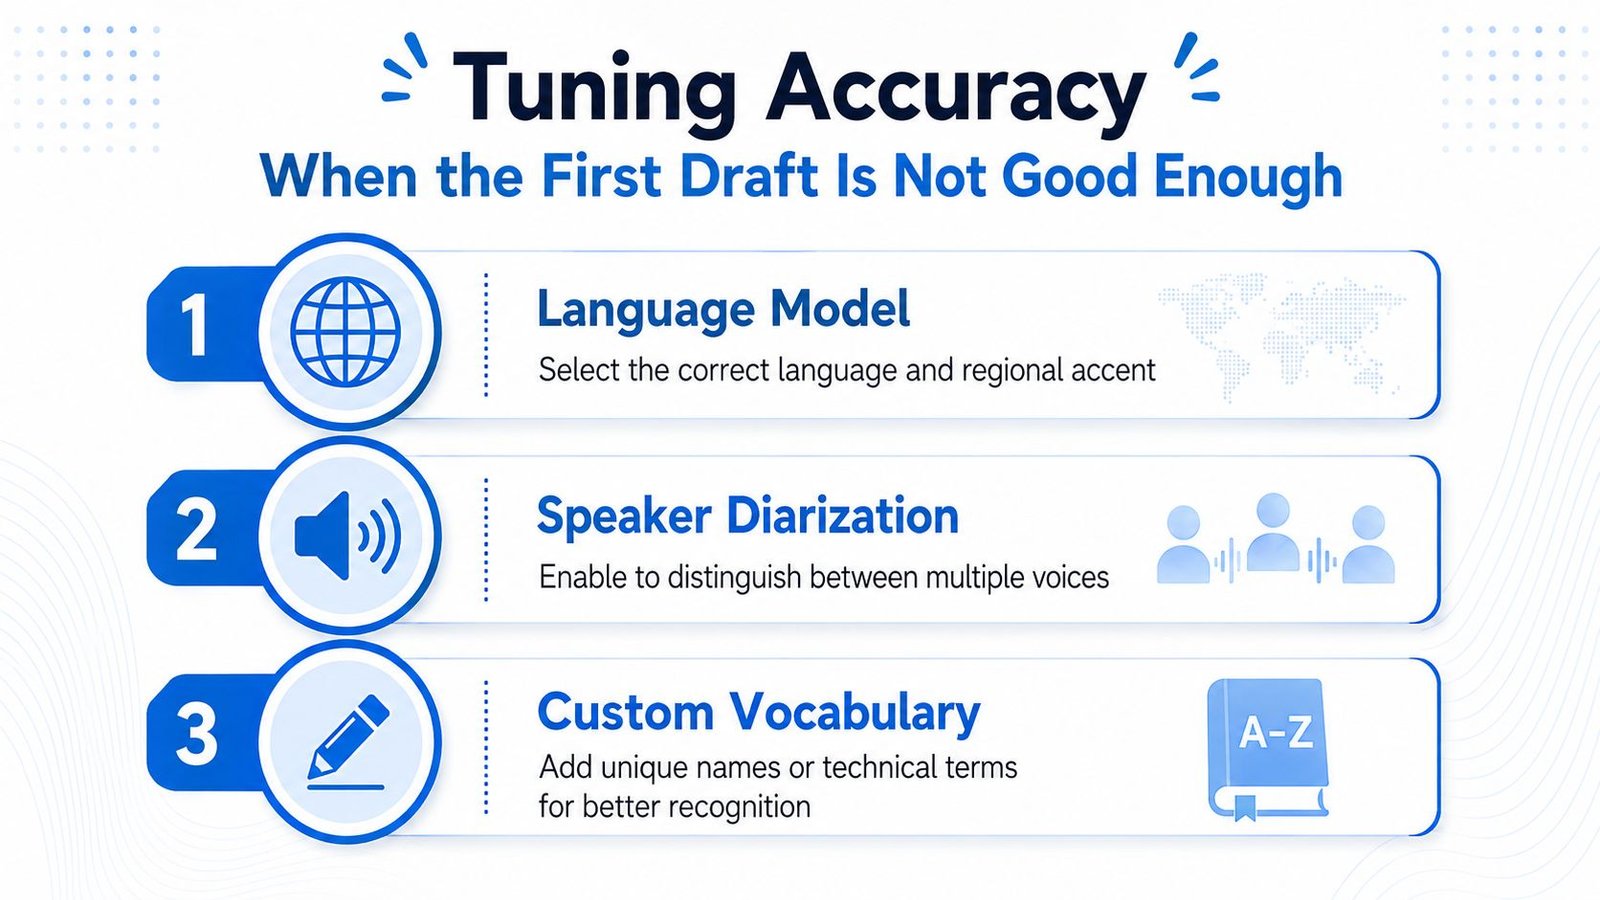
A rough transcript doesn't always mean the tool failed. Sometimes it means the settings, the room, or the speaker mix worked against it. In noisy environments, ASR systems can misinterpret roughly 15% of words, which is a reminder that accuracy is still tied to audio conditions and model fit. Happy Scribe audio to text overview
Adjust the model before you blame the app
Start with the language and accent setting. If the app guessed wrong, the transcript can drift fast. That's especially true in meetings with mixed accents or in classrooms where people switch terms often.
Speaker labeling helps in group settings because it separates voices and makes the draft easier to review. Custom vocabulary can also help if the app allows it, especially for names, product terms, medical language, or subject-specific words that keep getting mangled. Post-processing matters too, since punctuation and casing make the transcript easier to scan, even when the spoken content was captured correctly.
Know the limit of automation
Automatic transcription can get you a useful draft, but it doesn't remove the need for review. Human correction still matters when the text has legal, medical, academic, or client-facing value. That's also where summaries should be treated carefully. They're helpful for quick review, but they're not a substitute for checking the actual transcript when the details matter.
Rule of thumb: if a name, date, or instruction would matter later, read that line twice.
Use the same checklist each time the output looks rough. Confirm the language. Check the room noise. Look at the microphone distance. Then correct the words that would cause the most harm if left wrong.
Privacy and Connectivity Tradeoffs You Should Plan For
Many transcription tools are built around cloud processing, which means the audio goes to a server after you speak or upload it. That's convenient, and it often makes live transcription easier to use. It also creates a problem when the conversation is private.
Sensitive settings need a different standard
Medical visits, legal meetings, classroom discussions with minors, and conversations about money or personal history deserve more care than a casual restaurant order. If you upload that audio, you need to know who stores it, who can access it, and whether the connection is required for the tool to work at all. A cloud-first workflow can be fine for public or low-risk content, but it isn't the right default for everything.
The privacy question matters because some users don't just want a transcript, they want to avoid sending confidential speech to a server. That's especially important when the transcript itself could become part of a record. In U.S. healthcare, the HIPAA Privacy Rule gives patients the right to request access to their medical records, and covered entities generally must respond within 30 days, with one 30-day extension allowed if they provide a written reason. Canva audio to text converter page
Cloud, device-side, and offline each solve different problems
Cloud transcription usually gives you broad language support and easy access from different devices. Device-side transcription keeps more processing local, which can reduce exposure. Offline modes can be the safest choice when connectivity is weak or the content is highly sensitive, but they may limit language coverage or other features.
If privacy is the main concern, choose the most local option that still does the job. If convenience matters more and the content isn't sensitive, cloud transcription may be the better fit. The mistake is treating every conversation as if it has the same risk level.
Choosing the Workflow That Actually Fits Your Life
A good workflow starts with the setting, not the software. In a meeting, a laptop or tablet with live captions can help you keep track of speakers and action items. In a classroom, a phone or tablet close to the front may be easier to manage. In a restaurant or on a call, smaller, more discreet capture often works better because you're trying to hear through noise, not build a polished archive.
Travel changes the equation again. If you're moving through stations, airports, or unfamiliar places, quick live transcription can help with directions and announcements. For healthcare appointments, treat the transcript more carefully because the notes may later matter as part of a record. The internal guide on meeting minutes with action items is a practical fit when the goal is not just to capture words, but to preserve decisions.
Use this simple rule. If the conversation is public or low-risk, cloud convenience may be enough. If it's private, sensitive, or likely to be reviewed later, lean toward local processing, tighter device control, or a workflow that keeps the audio exposure low. And if you're trying to serve Deaf or Hard of Hearing participants, prioritize readable captions, stable live display, and a setup that doesn't make the person wait for the transcript.
iScribe Live Transcribe is one option built for live speech on iPhone and iPad, with saved transcripts, multilingual support, and file transcription in the same app. If you want to see whether that kind of workflow fits your own meetings, lectures, or everyday conversations, visit iScribe Live Transcribe and compare it against the privacy, accuracy, and device needs that matter most to you.
What is the fastest way to convert sound to text?
Live transcription is the fastest way. A live tool turns speech into text on your screen as the person is still talking, so you do not wait for a file to process. On iPhone and iPad, an app like iScribe shows the words in real time and saves them for later.
How do I convert sound to text in real time?
Open a live transcription app, allow microphone access, and start it before the conversation. The app listens through the microphone and displays the words as text while people speak. Keep the device close to the speaker and reduce background noise for the best result.
Can I convert sound to text without recording it first?
Yes. Live transcription works on sound as it happens, so you do not need to record a file first. This is useful in meetings, classrooms, and conversations where you want to follow along and keep a written record at the same time.
Is there a difference between converting sound to text and converting a file to text?
Yes. Converting sound to text usually means live speech captured through a microphone in real time. Converting a file to text means uploading a recording you already have. Live capture is faster in the moment. File conversion is better when the audio already exists.
How accurate is live sound-to-text conversion?
Accuracy is high with clear speech in a quiet space, and lower with background noise, several speakers, or strong accents. A good microphone, a closer distance to the speaker, and a quieter room make the biggest difference.