

To remove background noise from audio, match the method to the source: reduce noise before recording, use a noise-reduction profile for steady hums in recorded files, and use AI noise removal when the noise changes or time is short. The goal is speech clarity, so keep voices natural and avoid over-processing that hurts captions and transcripts.
You can hear the problem before you can fix it. A fan hum sits under the voices in a meeting recording, a café turns a lecture into a wash of noise, or a phone call leaves you with speech that's hard to follow and even harder to transcribe. For Deaf and hard-of-hearing users, that isn't just annoying, it can block captions, slow note-taking, and hide key words that matter for understanding.
That's why how to remove background noise from audio has to be more than a cleanup trick. The right approach depends on whether you're improving a live conversation, rescuing a recorded file, or trying to preserve speech cues for captions and transcripts. In the most useful workflows, you start by reducing noise at the source, then move to profile-based cleanup or AI-assisted denoising when the recording is already captured.
Table of Contents
- Why Background Noise Matters for Communication and Accessibility
- Reducing Noise Before You Record
- The Core Noise Reduction Workflow for Recorded Audio
- AI-Powered Noise Removal and Its Impact on Transcription
- Handling Recordings Where Noise Changes Over Time
- Balancing Noise Removal With Speech Intelligibility
- Choosing the Right Approach for Your Situation
Why Background Noise Matters for Communication and Accessibility
A noisy recording is more than a sound quality issue. In a restaurant, one person can still catch the gist of a conversation, but a caption reader may miss the exact word that changes the meaning. In a classroom, a lecture recorded beside an HVAC unit can be usable for the person in the room, yet frustrating for anyone depending on speech-to-text later.
Speech clarity is the real goal
The core issue is speech intelligibility. If background noise covers consonants, syllables, or sentence endings, then captions, transcripts, and human listening all suffer. That matters in meetings, healthcare appointments, and travel situations where people often need the wording, not just the general topic.
This is also where accessibility and audio cleanup overlap. A polished sound is nice, but a clear spoken message is what helps someone follow a doctor's instructions, review class notes, or catch a manager's action item. For Deaf and hard-of-hearing users, the audio itself may be secondary to the text it produces.
If you're comparing hardware first, a review of best noise-cancelling headphones can help you understand how listening-side noise control differs from recording-side cleanup. For live captioning and spoken-word access, that distinction matters.
Live audio and recorded audio need different fixes
Live conversations need noise reduced before the microphone captures them. Recorded files can be cleaned afterward, but the result still depends on what the mic picked up in the first place. That's why a smart workflow starts with the room, the mic, and the speaker's distance, then moves into editing only when needed.
Clear speech beats “clean” audio when the goal is captions or transcripts.
For readers focused on real-time captioning and live conversation access, assistive technology for Deaf and hard of hearing users is a useful way to think about the wider accessibility context. Background noise is not just an editing problem, it can be a participation barrier.
Reducing Noise Before You Record
The easiest noise to remove is the noise you never capture. That starts with microphone placement. Close-miking, where the mic sits near the speaker, usually gives speech more presence and leaves less room noise to fight later. Directional mics also help because they focus more on the voice and less on the room.
Match the mic to the setting
A lavalier microphone can make sense for healthcare appointments or interviews because it stays close to the speaker. A USB microphone is often a practical choice for a home office or a simple desk setup. In meeting rooms, a conference speakerphone can work better than a laptop mic because it is built to handle multiple voices across a table.
Environment matters just as much. Close windows, turn off noisy appliances when you can, and use soft furnishings to tame echo. A classroom with hard walls and empty desks can sound sharp and hollow, while a room with curtains, carpet, or bookshelves usually gives speech a more natural shape.
If you can hear the room from across the table, the mic will hear it too.
For a lecture, place the mic closer to the speaker than to the audience. For a one-on-one interview, keep the mouth-to-mic distance steady. For a group meeting, put the mic where voices are balanced instead of letting one side dominate the recording.
A simple pre-recording checklist helps:
- Check the room first. Listen for fans, traffic, projectors, and nearby chatter before you start.
- Test the mic distance. Move the mic closer until the voice sounds clear without distortion or harsh plosives.
- Reduce reflective surfaces. Soft items help with echo in classrooms, offices, and temporary meeting spaces.
- Record a short sample. Listen for hum, clipping, or uneven levels before the actual conversation begins.
These basics don't replace post-processing, but they make every later step easier. Better source audio means fewer artifacts, less aggressive cleanup, and better speech for transcription.
The Core Noise Reduction Workflow for Recorded Audio
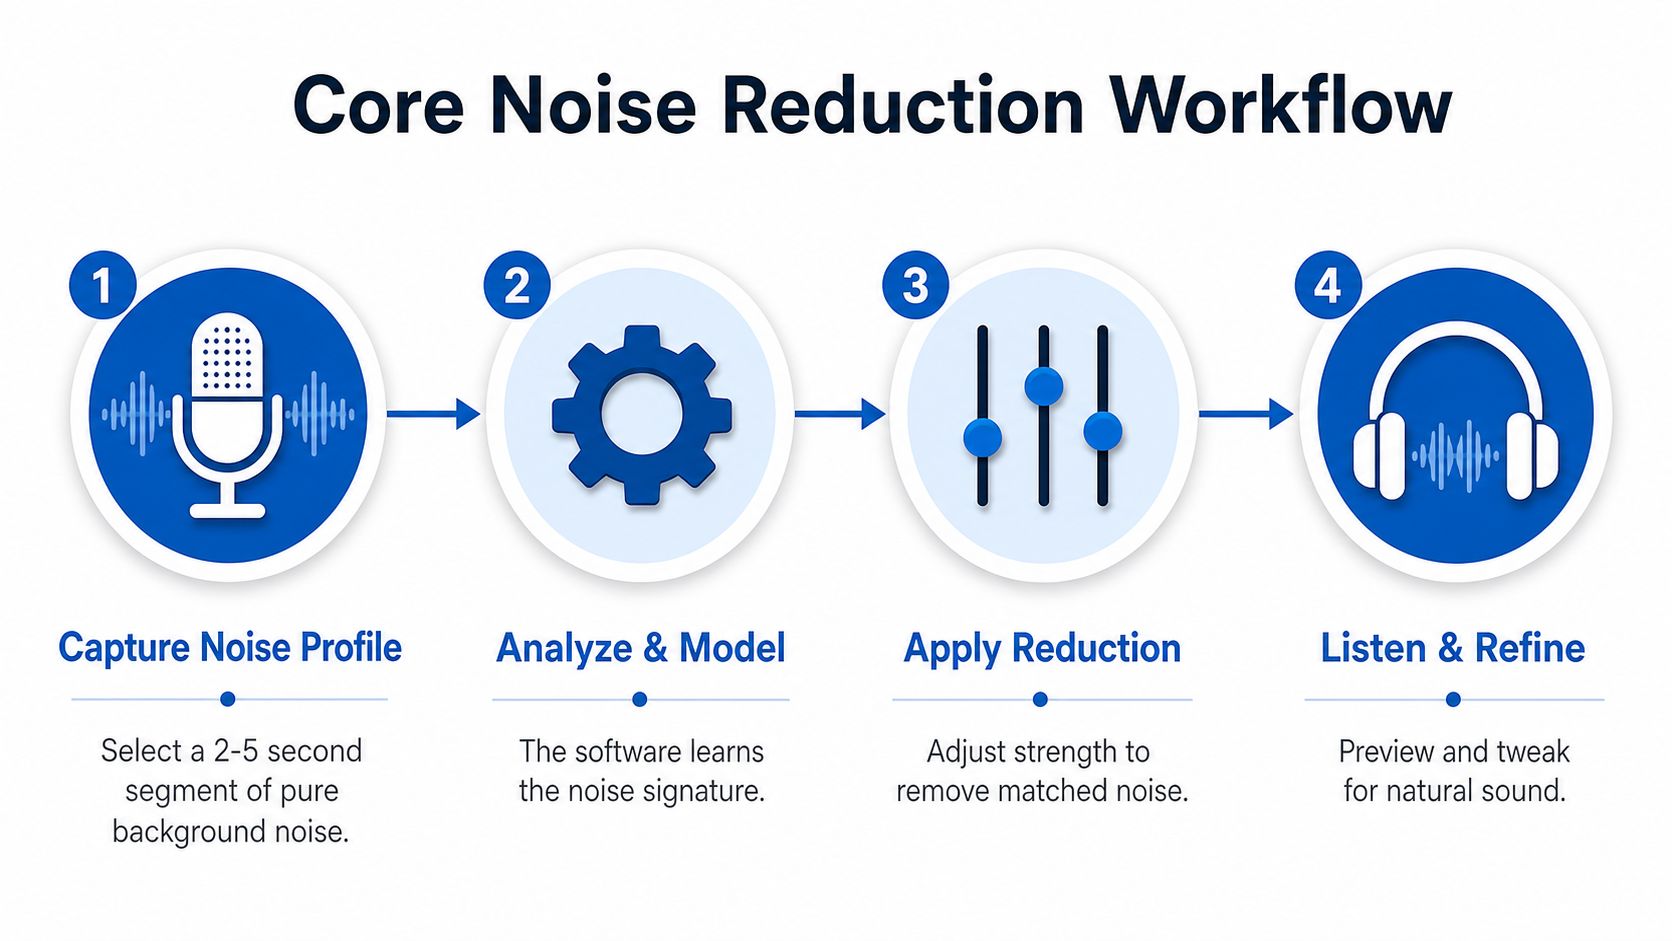
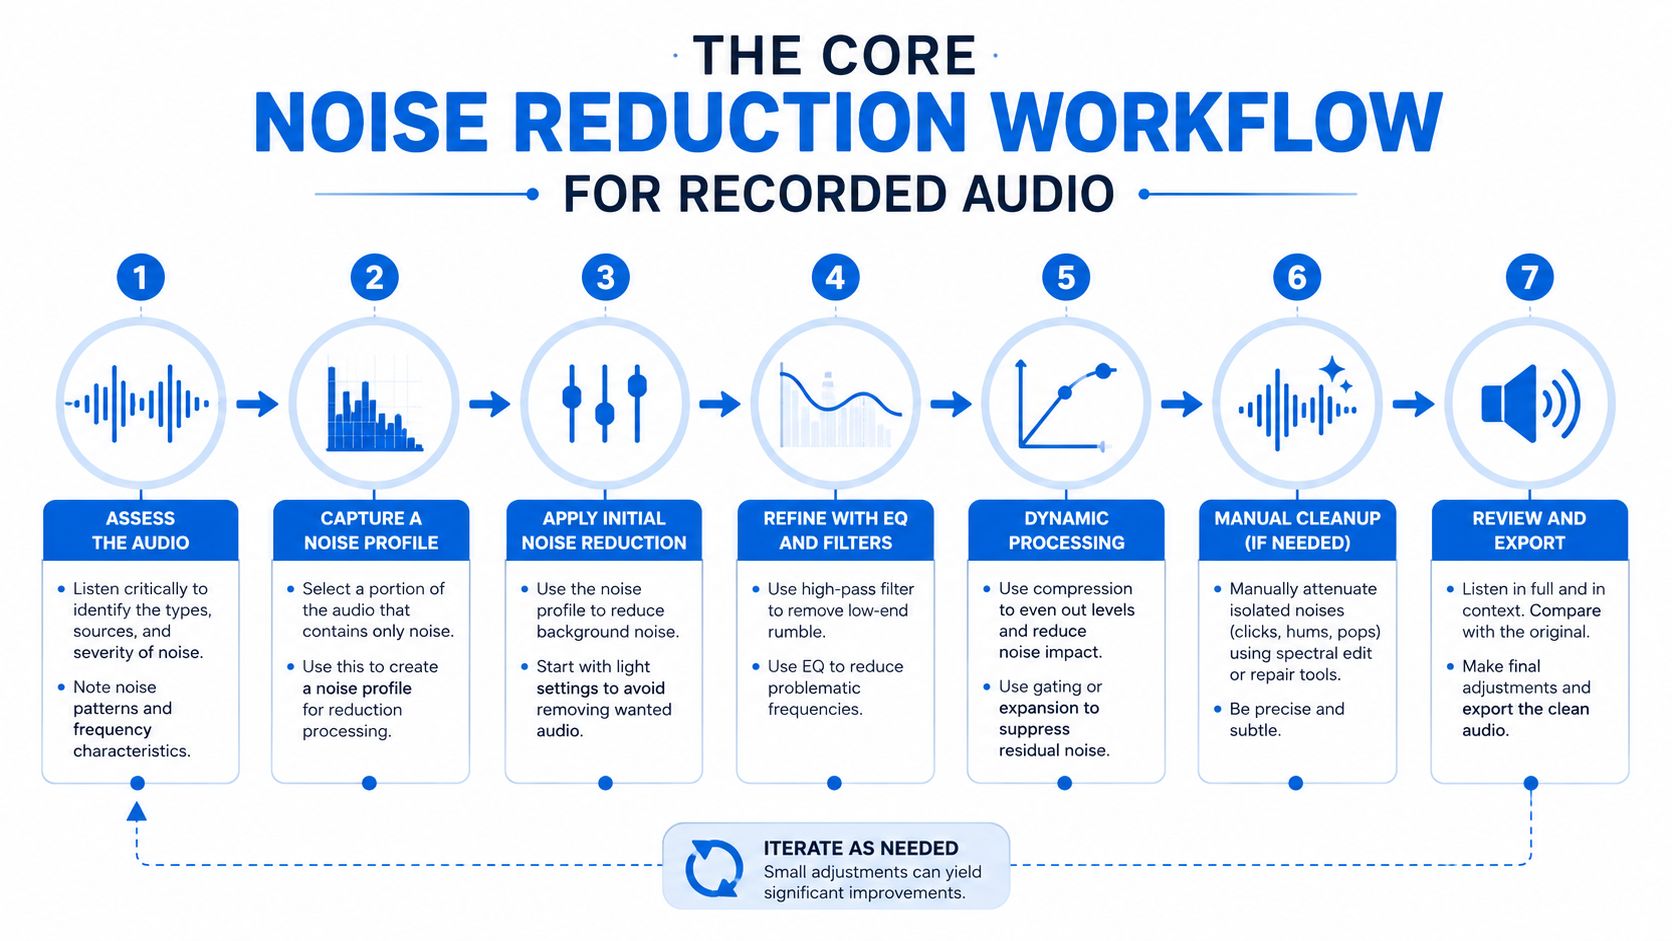
The most dependable cleanup method starts with a noise-only sample. In Audacity's official workflow, you select a section that contains only background noise, choose Effect > Noise Reduction > Get Noise Profile, then apply the effect to the audio you want to clean. The software learns the noise signature first, then reduces matching noise across the recording. Audacity's noise reduction guide also notes that you can preview the Residue, which is the part that will be removed.
Build the profile carefully
A noise sample needs to reflect the steady background, not the speech. Guidance across editing resources recommends 1 to 2 seconds of pure noise, with up to 5 seconds often better, while an independent guide says 0.5 seconds can be enough for stationary broadband noise. That sample should avoid coughs, clicks, pops, or sudden shifts so the profile doesn't learn the wrong thing. Timbrica's noise removal guide makes that point clearly.
Once the profile is captured, start with a gentle setting. A conservative starting point is around 12 dB of reduction, and 12 to 18 dB is often described as the practical limit before “watery” artifacts become obvious, according to the same independent guide cited above. Those numbers matter because stronger reduction can improve clarity while also stripping the natural texture from speech.
Listen before you commit
Previewing is not optional. Aggressive settings can create metallic, hollow, or underwater sound, and once that happens the voice may be harder to understand than the original noisy clip. Audacity's residue preview is useful because it helps you hear what the software plans to remove before you apply it.
For speech recordings, I've found that two lighter passes usually beat one heavy pass. That lines up with guidance that recommends starting gentle and making multiple reductions rather than pushing one filter too far. Harlem World Magazine's podcaster guide makes the same case.
This workflow is still the foundation in many editors because it gives the user control. It works best when the noise stays steady from start to finish, like a fan, a hum, or a constant air conditioner.
AI-Powered Noise Removal and Its Impact on Transcription
Modern tools no longer rely only on a manual noise profile. Many now let you upload audio or video and let the software decide what sounds like speech and what sounds like unwanted noise. That shift is visible in AI-based products and in coding workflows, where a parameter such as prop_decrease=0.8 tells the software to remove 80% of detected noise in that example. Media.io's AI noise reducer overview describes this broader move toward automated suppression.
What AI does differently
AI denoising is designed to estimate the speech signal across the whole file, not just subtract a single steady profile. In practice, that means it can help with mixed audio where speech overlaps with room noise, fan noise, or background chatter. It also matters for accessibility because clearer speech usually gives captioning and transcription systems a better signal to work with.
That said, automation is not magic. If the processing is too strong, consonants can get softened or smeared, and those are exactly the cues human listeners and speech recognition systems need. Clean audio helps, but over-cleaned audio can hurt the words you were trying to preserve.
Use cases where AI fits well
AI denoising tends to work well for:
- Meeting recordings where a quick cleanup is more important than manual editing.
- Lecture captures that need clearer speech for study notes.
- Phone calls where the goal is making the conversation easier to follow.
- File uploads for captions or archives where speed matters more than fine-tuning every segment.
For an accessibility-focused look at transcript workflows, AI audio transcription apps is a helpful adjacent resource.
The best AI cleanup is the kind you forget about because the words stay easy to follow.
I also like to check how social platforms explain automated media tooling, because it often reveals the trade-off between simplicity and control. Captapi's social API insights is useful context if you're comparing products that automate media handling in different ways.
For transcripts and captions, I'd use AI when the file is messy but the speech is still present. I'd use a lighter touch when every consonant matters.
Handling Recordings Where Noise Changes Over Time
A single noise profile works best when the noise stays stable. Real recordings often don't behave that neatly. Traffic passes outside, HVAC systems cycle on and off, café chatter rises and falls, and crowd noise changes from one part of an event to the next. A profile learned from the intro may be wrong by the middle of the recording.
Why one profile can fail
Audacity's own documentation recommends finding a section that is “just your background noise” and using it as the profile, and other guides tell users to sample the noisiest section while avoiding transients. That advice is useful, but it breaks down when the background changes. A profile that fits one part can leave noise behind in another, or create strange artifacts where the audio is quieter.
A segment-by-segment approach makes more sense. Treat the recording as several smaller problems instead of one big one. Light reduction on each section usually sounds more natural than forcing the entire file through one aggressive pass.
Better options for variable-noise files
For recordings with changing noise, use a mix of methods:
- Apply light passes to separate sections. A hallway interview and a quiet ending may need different treatment.
- Use gating on silent parts. Silence can be cleaned without touching spoken phrases.
- Use spectral cleanup on speech sections. This helps when the noise sits under the voice but doesn't stay consistent.
- Retest each section by ear. The best setting in one part may be too strong in another.
A practical example is a lecture recorded in a room with an air conditioner that cycles during the class. The opening may be clean enough for a standard profile, the middle may need a lighter second pass, and the Q&A may need different treatment again because audience noise comes and goes.
This is one of the biggest gaps in common tutorials. Most of them assume the recording is stable enough for a single fix, but real-world audio often isn't. If the noise changes, the method has to change with it.
Balancing Noise Removal With Speech Intelligibility
Audio engineers often aim for a polished result. Accessibility users usually need something different, a voice that stays understandable. Those goals overlap, but they are not the same. If aggressive denoising removes the breath of a word, softens a consonant, or leaves the speech hollow, the recording may sound cleaner while becoming harder to follow.
What overprocessing sounds like
Too much reduction can produce metallic, underwater, or hollow artifacts. Those artifacts are especially frustrating in meetings, healthcare calls, and classroom recordings because they blur the very speech cues that listeners and captioning systems depend on. The result is a file that sounds “processed” but communicates less.
The safer approach is to start gentle, preview the result, and compare it against the original. If the noise is still distracting, use a second light pass instead of jumping straight to a strong setting. That approach is repeatedly recommended in editing guidance because the ear often tolerates small amounts of background noise better than unnatural speech damage.
| Use Case | Reduction Level | Priority | Risk of Artifacts |
|---|---|---|---|
| Listening pleasure | Moderate cleanup | Natural sound and less distraction | Medium if pushed too far |
| Transcription accuracy | Light to moderate cleanup | Preserve consonants and speech cues | High if speech starts to blur |
| Live captioning | Light cleanup | Keep words intact for speech recognition | High with aggressive filtering |
What to prioritize in accessibility work
For Deaf and hard-of-hearing users, the question is not whether the file sounds studio-clean. The question is whether the words stay readable and accurate. That means preserving articulation, keeping the voice natural enough for repeated listening, and avoiding overcorrection that makes captions or transcripts less trustworthy.
If you're choosing a captioning tool, best live caption apps for Deaf users can help you think about the broader workflow, but the audio still has to support the text. Good cleanup helps. Over-cleanup can get in the way.
Choosing the Right Approach for Your Situation
Start with the source if you can. Use close miking, a quieter room, and the right hardware for the setting. If the recording is already made, choose the method that matches the noise pattern, not the one that promises the most aggressive cleanup.
For stable noise, a profile-based tool like Audacity's noise reduction workflow is often a strong fit. For variable noise, work section by section and keep the passes light. For live captions or transcripts, protect speech intelligibility first, because the point is understanding the words, not chasing a sterile sound.
Free tools can handle many steady-noise jobs. AI-powered tools are useful when the file is messy, time is short, or the noise changes too much for a single profile. The right choice depends on whether you need listening clarity, caption accuracy, or a record you can review later with confidence.
iScribe Live Transcribe gives you live captions, saved transcripts, and AI summaries for conversations, meetings, lectures, and recordings on iPhone and iPad. If you want a practical way to keep speech readable when background noise gets in the way, visit iScribe Live Transcribe and see how it fits your accessibility or note-taking workflow.
How do I remove background noise from an audio recording?
Start with a noise reduction tool that samples a quiet section of the file to build a noise profile, then apply it gently to the whole recording. For steady sounds like a fan or hum, a single profile works well. For noise that changes over time, use AI noise removal or process the file in shorter sections.
Can I remove background noise without losing speech quality?
Yes, if you avoid over-processing. Remove only as much noise as you need to make speech clear. Cutting too aggressively creates a watery or robotic sound that hurts both human listening and transcription accuracy.
What is the best free tool to remove background noise?
Audacity is a strong free option for recorded files, using its Noise Reduction effect with a sampled noise profile. It handles steady background noise well, though variable noise may need an AI-based tool.
How do I reduce background noise during a live conversation?
Reduce noise at the source first: move closer to the speaker, pick a quieter spot, and use a directional or headset microphone. For live captions in noisy places, a live transcription app like iScribe can help you follow speech on screen while it happens.
Does removing background noise improve transcription accuracy?
Yes. Background noise hides consonants and word endings that speech-to-text relies on. Cleaner audio with clear speech leads to more accurate captions and transcripts, which matters most for Deaf and hard-of-hearing users.